
Accelerator version 6.1.4.0 makes deploying WPF applications to multiple environments much easier and now generates scripts to automate and standardize the deployment process. Once configured, a developer can deploy to multiple environments by running a .bat file. This can be further automated by using 3rd party products such as TeamCity
This documents the process of adding the necessary files to your system to support the deployment scripts. Systems generated with version 6.1.4.0 and greater already have these files generated and can refer to instructions to configure the deployment scripts.
Steps:
1) Generate the Build and Deployment Scripts
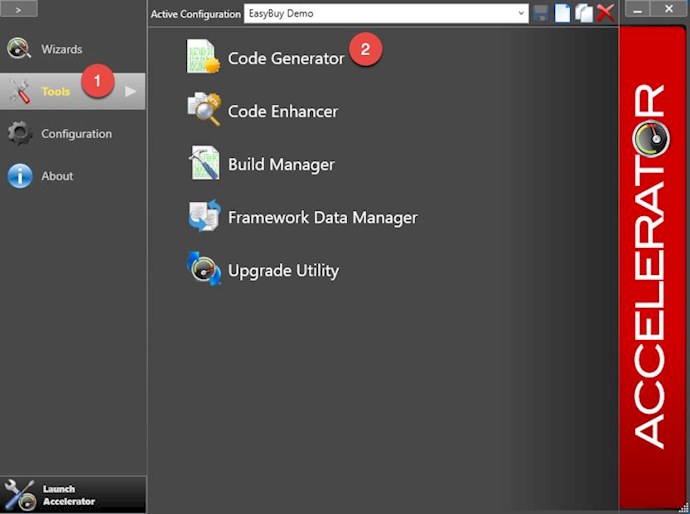
- Launch the Accelerator Launchpad
- Click Tools (1) and then click the Code Generator (2)
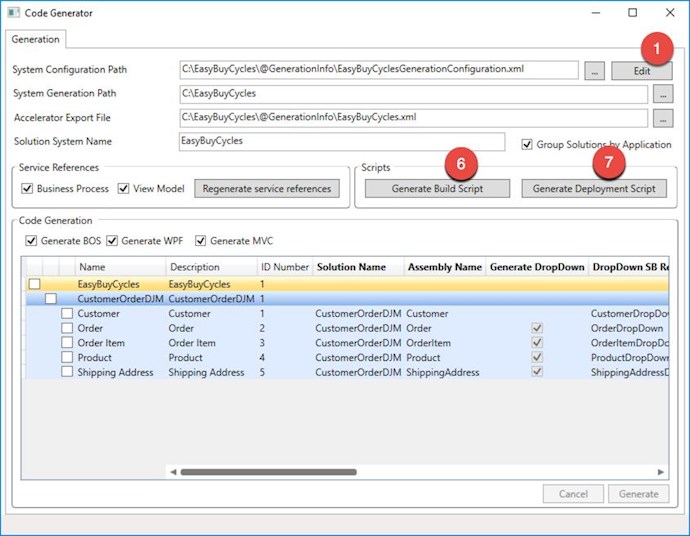
- Select the System Configuration
- Click on Edit Button (1)
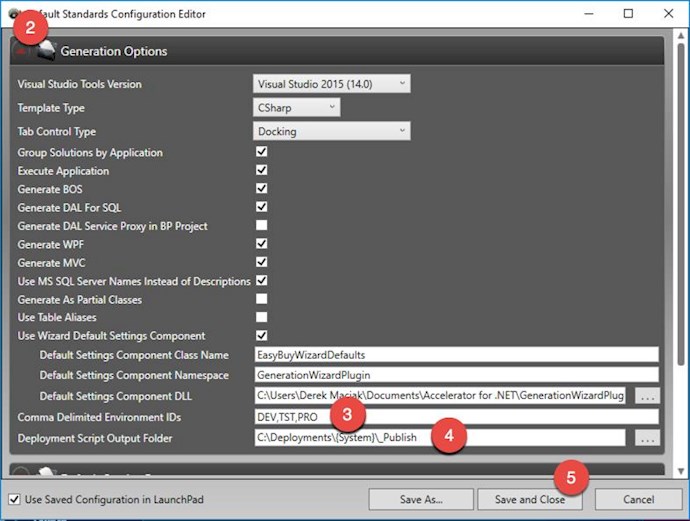
- Expand Generation Options (2)
- Specify your Envionment IDs separated by a comma (3).
- Specify the Deployment Output Folder (4). It is recommended to keep this folder outside of source control. This is where the packages will be created. There will be 1 zipped folder per environment ID.
- Click Save and Close (5)
- Click Generate Build Script (6)
- Click Generated Deployment Script (7)
2) Add ConnectionParms.config and Service.Config for each Environment ID.
- Open one of your Visual Studio Solutions. We will only be working with the System projects, so you can just open the .sln located in your system folder.
Updates to your DALServiceHost Project:
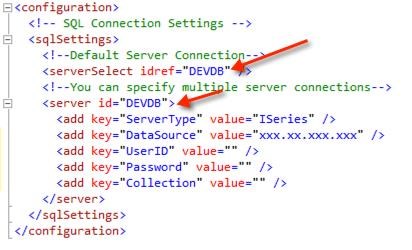
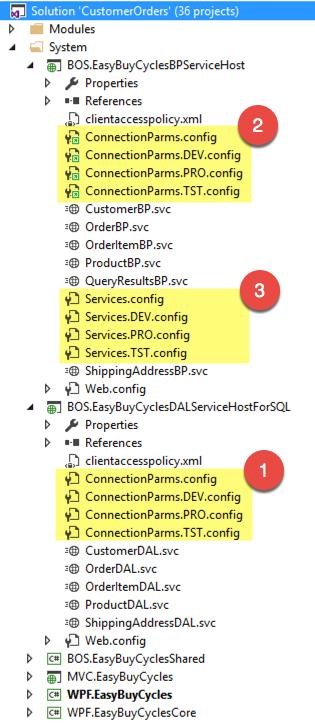
- In your DALServiceHost Project, Create a ConnectionParm.config for each of your Envionment IDs. The name of each config should follow this standard: ConnectionParms.<EnvironmentID>.config (1).
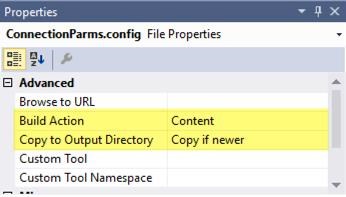
- Set the Build Action to Content and the Copy to Output Directory to Copy if newer.
- Setup each ConnectionParms.<EnvironmentID>.config with the correct settings for the environment. It may be helpful to set the "idref" to something meaningful like "DEVDB", "TSTDB" etc. Just make sure to set the idref and the server id.
Updates to your BPServiceHost Project:
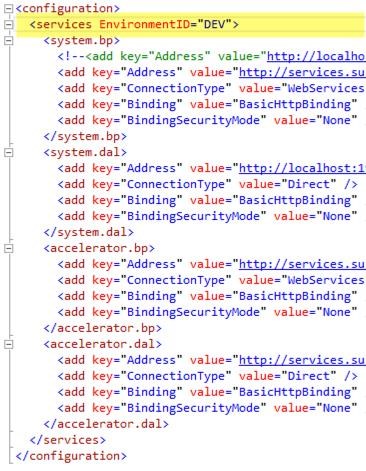
- In your BPServiceHost Project, Create a Services.config for each of your Envionment IDs. The name of each config should follow this standard: Services.<EnvironmentID>.config (2).
- Set the Build Action to Content and the Copy to Output Directory to Copy if newer.
- Setup each Services.<EnvironmentID>.config with the correct settings for the environment. You can also add a new attribute to the services element called EnvironmentID. This attribute is picked up by the WPF runtime engine and displayed on the logon, splash and browser status bar. This helps identify what services are being called.
- In your BPServiceHost project, you can also add the existing items (all your newly created ConnectionParms.<EnvironmentID>.config) from your DalServiceHost (3). When you add them make sure to specify "Add As Link"

- Set the Build Action to Content and the Copy to Output Directory to Copy if newer.
Here is an exmaple of what your dal and bp service hosts should look like:
Updates to your WPF System Project:
- In the WPF System Project, add all your newly created ConnectionParms.<EnvironmentID>.config from your DalServiceHost and all your newly created Services.<EnvironmentID>.config from your BPServiceHost as linked Items. When you add them make sure to specify "Add As Link"
- For all the Services.configs, Set the Build Action to Content and the Copy to Output Directory to Copy if newer.
- For all the ConnectionParms.config, Set the Build Action to None and the Copy to Output Directory to Copy if newer. (Setting the Build Action to None will ensure that the connectionParms.config is not deployed to the WPF client)
Refer to Configuring the Click Once Settings for use with Deployment Scripts for more details on setting up the Deployments
